Until relatively recently, a large bunch of parsley would totally freak me out. I’d use a sprig or two for a recipe and then slowly watch the rest wilt away in my fridge, much to my dismay. I then learned to make Green Rice, Salsa Verde and Tabbouleh, which would use more of the sprigs, but when you come into an abundance of parsley, you can still get burnt out on these pretty quickly. Parsley, however, is a simple and wonderful thing to preserve while it’s in abundance for use at a later date.
There are many methods to preserving parsley, I’ll share the 3 that I am currently using with the recent parsley harvest.
For short term storage, I rely on the same fridge method that my counterpart Sarah recently shared here. If preserving for longer than a few days, though, I dry it out or freeze it.
If you have a food dehydrator, you won’t need to read about the drying methods I use as you’ll already have the perfect means for drying this versatile green. If you are without a dehydrator, feel free to read on.
One method I use to dry parsley is to put it in the oven at a very low temperature, (the lower the better I think…) My oven goes as low as 150, but I wouldn’t recommend using anything higher than 175 as your parsley may brown and lose flavor.
I separate the leaves from the stems (stems make for great flavor in veggie broth) and scatter them in a single layer on a parchment-lined cookie sheet. I check them every 10 minutes or so, until the leaves are dry and crumbly (this batch took about 30 minutes in my oven).
After it is crumbly, I crumble it and remove any stems that I missed at this point.
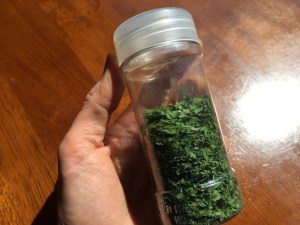
One bunch of parsley makes about half a jar’s worth that can be used over the next several months! I use a recycled spice jar as shown, and pop the whole jar into the freezer, pulling it out to use as needed.
Another option is to air dry your parsley, which I usually only do if have lots of parsley and no time to dry it in the oven. I separate it into small batches and hang it upside down like so.
I find it to be more susceptible to yellowing and not fully drying this way, so I usually end up keeping it like this temporarily until I have a moment to dry it in the oven.
Finally, I’m trying a new method for preserving the parsley. I had enough yummy veggie scraps to make a veggie broth, which I did in the slow cooker overnight (see this post for details).
I blanched the parsley for 15 seconds before plunging it into icy water. The leaves were then separated from the stems and put into the bottom of my small 1-cup plastic containers. (The stems were put into my freezer bag of veggie scraps for the next round of veggie broth).
A bunch of parsley made enough for 4 soup bases.
I then covered the parsley with a cup of the strained veggie broth. I had enough leftover broth for about 4 regular cups, all 8 containers are headed for the freezer.
Once they freeze, I pop the broth bricks out of the containers and store them in large freezer bags, marking the parsley ones for soup use. Paired with the remaining frozen Springdell celery in my chest freezer from last fall, I’m set with a soup “kit” when I’m ready to make chicken soup, veggie soup, and the like. The best part is – no parsley wasted!
Please note there are many other methods out there for drying and preserving parsley. See what will work for your household and your schedule, and always, please share here so that we may all learn together!


